
barn raising

In the spirit of making do while building shelter.
Imagine a foundation on only 3 sides(and a middle partition), and one on the far side has settles and slopes, losing 2 inches over 12 feet. The foundation has some sheet spalling in spots as it went thru fire, but otherwise is solid. You get a shovel and wheel barrow and remove all the ash and debris. Sweep off the foundation tops. Get some string and stakes and figure out how to square it off with a fourth side. So, how to have a foundation on the missing side ? There are various possibilities. Dry stacked rock or concrete rubble ? Rot resistant wood ? bags filled with soil ? Luckily, we still have access to some bagged concrete. That wall is 22 feet long, so we get a shovel and dig 6 "post hole" type holes, one at each end and 4 spaced out between. Once the concrete is semi hard, we gently set in something to support a rot resistant wood beam into each. When it is all set in a day, set the rot resistant wood there.
Wood is still available, scrounged and bought dear. But who can hire help these days ? And it is hard to raise walls by oneself. Here is where we need the old fashioned barn raising. Best is to find an elder who knows how it is done to instruct the process. Ancillary to this are the home improvement guides. Like, Creative Homeowner Press "Quick guide to garages and carports " or maybe one of the Sunset how to books.
mountainmoma
Mon, 11/15/2021 - 23:31
Permalink
Luckily we have a few elders
Luckily we have a few elders
mountainmoma
Mon, 11/15/2021 - 23:34
Permalink
But, the weather did not co
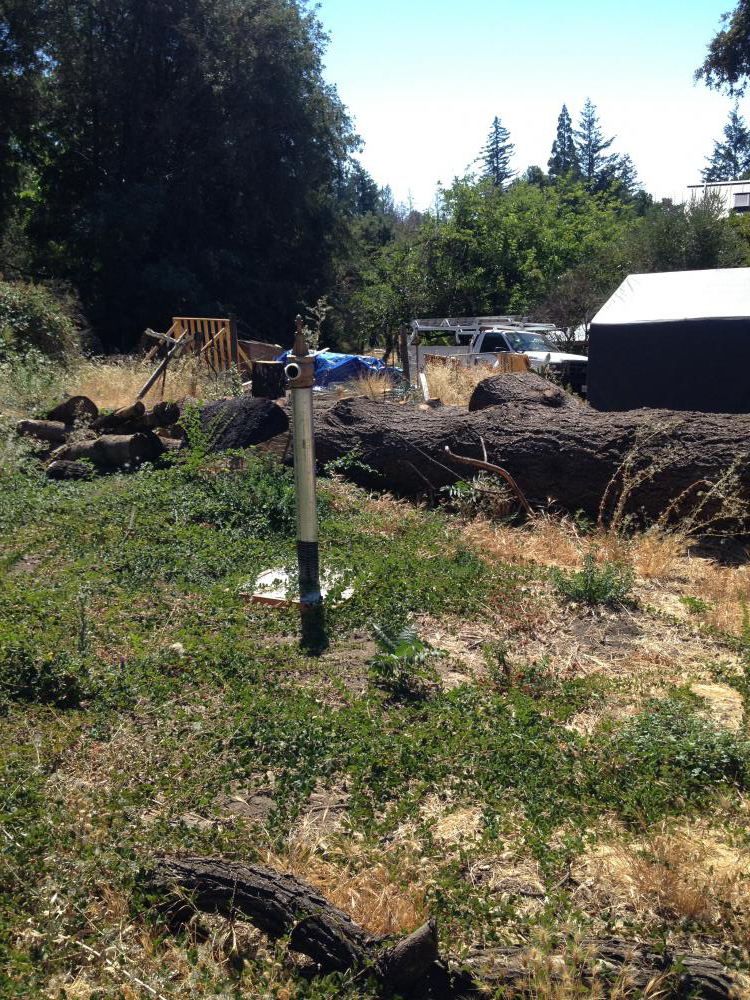
But, the weather did not co-operate. Wind gusts well over 70mph and 20 inches of rain pulled out framing nails and leaned walls in the incomplete shelter. ( this photo is before the storm hit)
mountainmoma
Mon, 11/15/2021 - 23:43
Permalink
That's alot of rain, better
SO, 2 people and 5 hours later, back to where it was and mostly plumb. That's alot of rain, better have more slope on this roof. A cripple wall, like a realy short second story wall, is added. Now, instead of a 14 inch rise over the 12 foot width, we have a bit more than 36 inches, or a " 3 over 12 " . Have to rush more before the next storms and batten it down.
You can see the improvised foundation under this wall, rot resistant wood in the brackets
mountainmoma
Mon, 11/15/2021 - 23:50
Permalink
Pulling back together after
Pulling back together after the storm on the burnt foundation is good, but not perfect. Each roof rafter has to be measured individually to notch the bottom "birds mouth" in the right spot. Still something is not right just placing them at 24" somehow. SO, the top ends are attached, and some plywood hoisted up and the rafters nudged over to make it so they are "trued" to where the sheets of plywood would want them to be. It worked.
mountainmoma
Mon, 11/15/2021 - 23:54
Permalink
Like one of the books in the
Like one of the books in the little house on the prairie series, this quick shack is only half a house ( barn in this case). No time and money this season for more. We'll get the other half next year, God willing and the creek dont rise.
mountainmoma
Tue, 11/16/2021 - 00:23
Permalink
cant waste time and money on
cant waste time and money on an area to get ripped out when the second half is done. That old, half rotted grungy half sheets of plywood have found a last use. I painted them over today and they are screwed in to facilitate removal.
The whole thing needs to be protected from the elements. Tar paper used to be made out of recycled cotton cloth soaked in tar. Lindseed oil and Iron Oxide is the original barn red paint. If the surrounding forest wasnt a state park, redwood bark or bark on slabs are fire resistant and shed rain. The Ohlone foraged for Tule reeds in the now much reduced and protected wetlands by the coast, bundles of them shed rain well.
I am left to forage at the Big Box store and freecycle. Freecycle sources yielded no paint. But, it turns out that you can sometimes find paint color mix up paints at all the locally owned and big box hardware stores. The big box had 5 gallons of premium all in one behr paint and primer for $30 for 5 gallons ( normally over $200). I found a brown with purplish undertones last month, and this month a greyish off white. I used the greyish off white as the first primer coat. With an aartistic eye and carful choices, mix different paint buckets together for a new color and lots of it.
So, in all seriousness, this area had a major wildfire last year, and this area is slowly rebuilding. This half-house is 12 feet wide and 22 feet long, divided into 2 rooms with a connecting door, dirt floor. My pioneer foremothers would have been thrilled with the space and would be saving her egg money to buy some window glass next year..... I am hoping to be able to bring my diary goats home again sometime soon.
mountainmoma
Tue, 11/16/2021 - 00:32
Permalink
inspiration
here is one way to use up shingles when you dont have enough, I took this photo today when I was out gathering materials.
( That there is a California million dollar home )
ClareBroommaker
Tue, 11/16/2021 - 02:40
Permalink
flounder house
Looks very satisfying! I can never be around lumber being cut without remarking how good it smells. If the smoke odors have diminished around your home, I bet the outdoors there smells great all the time.
Around here we call this sort of "half house" roofed in a single slope a "flounder house". This is your barn? Flounder barn, then, I guess.
Is the roof galvanized metal? In your third picture, the stuff that the roll of fencing is sitting on looked to me like it might be corrugated metal, or maybe pvc pipes laid out together.
Does the second photo show the items you placed in the concrete foundation to support the frame? What are they? Are the made for that purpose? How high are they?
I'm trying to think what one calls the pre-made concrete blocks or mushroom shaped supports that used to be used to hold wood frame buildings up from the soil. All I can come up with is "stools," but that doesn't seem right.
Update: Staddle stone. https://en.wikipedia.org/wiki/Staddle_stones
mountainmoma
Tue, 11/16/2021 - 01:04
Permalink
There is no roof yet, the
There is no roof yet, the plywood just got put on friday. It will be either shingles as I have a bunch of mismatched, or roll roofing as someone gave me 2 rolls but I would need to buy two more. I have no-one to do the work and it is variously heavy, so I will try to get the roofing felt and drip edge on and then to and figure it out, it may be a Boulder Creek 90 day roof for a bit ( a large blue tarp over the roofing felt) but on my ridge that is a risk in the winds.
The galvanized metal on the ground needs to be picked up and sheltered somewhere as that is the roof of a chicken coop I took apart to bring home and havent had time for yet.
The brackets are made to hold up a post like a 4x4 post. There is not concrete foundation on that side, it is like digging post holes and then instead of a post in the brackets there is a square of the wood and then the long wood beam in nailed to that wood. This wall is not realy load bearing and I wanted it low to the ground.
you are thinking of pier blocks. But, they are bulky and can settle as they just sit on top. Of course, my deck and house have pier blocks for some places. Another thing is to use round cardboard forms to do what we did on mine with the brackets. The cardboard forms keep the shape to make it higher off the ground, and you choose how high you want that part to be. Either way, pier blocks or pour inplace are most often used to support a 4x4 post, or for simple small outbuildings, the floor frame will sit right on them if they are well leveled.
What are you building ? That will tell you want you want. Another very small outbuilding of mine that burned was just on piers, it was about 120 sq ft and was my ex's office for a while and hten a spare detached bedroom.
David Trammel
Tue, 11/16/2021 - 15:41
Permalink
Cardboard Concrete Forms
Are you talking about the tube forms?
I've used the smaller ones for fence posts and clothes line posts. I wonder now if you couldn't use say a 12" tube, with about 8-10" sticking out of the ground, pour that with a few pieces of rebar sticking out horizonally. Then once its dry, remove the cardboard tube, and put an 1' tall 18" round piece of tube around it and pout more concrete in. Basically to make a Top Hat kind of pier?
Maybe that wouldn't settle as much.
mountainmoma
Tue, 11/16/2021 - 01:15
Permalink
pioneer half shack ike this
pioneer half shack ike this
https://i.pinimg.com/originals/75/e2/54/75e254bef250039dd0674bf80c429978...
ClareBroommaker
Tue, 11/16/2021 - 03:18
Permalink
tarpaper shack
Yes, I almost wrote above that people still lived in tarpaper-ed shacks near me as late as 1979. They were raised upon cinder blocks, concrete blocks, or staddle stones. Even along I-55 between Memphis and St Louis there were a number of them visible from the interstate as late as 1982. Going farther south, I'm pretty sure they were even more prevalent. Trying to avoid termites, other insects and mice is one reason to get a house off the ground in warm winter areas.
mountainmoma
Tue, 11/16/2021 - 10:43
Permalink
concrete pier blocks
concrete pier blocks are capped with wood to nail to or metal brackets or straps . In soft soil, they can settle iff too much load on them, so they are used for holding up , for example, my floor beams in the house at intervals in between the foundation, not as a foundation substitute. On very small structures like small shed they hold up the structure. At $5 a pop if you emergency shelter was small, to be used later as a shed for wood or goats, you would definitely pick up a few and what plyuwood you could afford and shelter yourself.
https://www.homedepot.com/p/8-3-4-in-x-10-3-4-in-x-10-3-4-in-Concrete-Pi...
https://www.homedepot.com/p/Concrete-Pier-Block-with-Metal-Bracket-80531...
David Trammel
Tue, 11/16/2021 - 04:38
Permalink
Like a Puzzle / Do You Mind If I Mention This?
I love putting together things like this, and like my basement apartment. Its like a big fun puzzle trying to figure out where to put everything. Very nice post, thank you.
Do you mind if I mention this tomorrow on my Weekly Updates to FB and to Ecosophia as a "hot topic"?
mountainmoma
Tue, 11/16/2021 - 17:43
Permalink
go ahead
go ahead
David Trammel
Tue, 11/16/2021 - 18:30
Permalink
thanks
Its a great post, and should be shared.
mountainmoma
Tue, 11/16/2021 - 19:14
Permalink
Oh, not on Facebook, I did
Oh, you are mentioning we have a post, not putting the photos or post on FB ? Once a photo is on facebook it can end up anywhere. SO, please no photos or excerpts on facebook, but mentioning there is a post is fine
David Trammel
Tue, 11/16/2021 - 19:45
Permalink
The FB post looks like this
Here's all I post, a short description and the links back to the GW site. The only picture is the one that goes with the main page blog post. Here is last week's one:
---
Its Wednesday and we've got some interesting topics going on at the main website. Come join us and check them out.
First the new main page blog post for this week, "Preparing Shouldn't Hurt" takes on one of the popular myths in the prepping community, that being a prepper is meant to be difficult. It's not and it should never be.
https://greenwizards.com/node/1605
Next over on the Green Wizards forums, we have a question for everyone. With Fall here, what are YOU foraging from your neighborhood?
https://greenwizards.com/node/1603
Then we have two posts of note, "A Look At The Supply Chain Issues" which takes information from a couple of people deep in the US supply chain who explain, its not as simple as the Media pundits say. There are deep issues with why we are seeing problems. If you are in a position in the chain, and can add your observations, we'd appreciate it.
https://greenwizards.com/node/1596
The second post, is a look at the information we get now, and how you can't take it for face value anymore, "A Tutorial On Evaluating Information". Not all news is meant to be informed discussion. Some of it has a completely different agenda.
https://greenwizards.com/node/1604
---
I'd say something like this for your post:
"And check out the photos of an "new" fashion barn raising in this post"
mountainmoma
Wed, 11/17/2021 - 00:58
Permalink
that's fine. Sorry to be
that's fine. Sorry to be trouble, but many of us have been burned by facebook in the past
mountainmoma
Sun, 12/05/2021 - 19:49
Permalink
scavaged roofing
It is still possible to scavange roofing shingles, but not as much as you would think as they are sold in bundles off 33 sq ft, so savvy buyers try not to overbuy. Eyeballing the piles of roofing, it seemed like there should be enough bundles, but then how to lay them out ? All the red are the same brand and color, most old, 2 bundles fairly new. The grey didn't seem to be enough, so someone gave me some more, but they are mostly actually a very green grey with half a bundle of grey, so they lighter color I am using comprises 3 brands/ slightly different colors. half the green/grey have one end damaged, a tree came down on someones stack. Those are used for the light shingle cut pieces on the rake ends, then a green-grey subbed in now and then in the middle so it ties together. I decided to use one light colored for every 2 red shingles, I sketched out a couple possible layouts on paper first and decided on layout. I am extremely slow. Here it is so far
mountainmoma
Mon, 12/13/2021 - 16:03
Permalink
Just in time for the latest
Just in time for the latest storms. Rain is blowing in further than one would think thru the open doorways which will harm nothing except the tool box was open in there at first, but the roof is now water proof
ClareBroommaker
Mon, 12/13/2021 - 17:05
Permalink
rain on the new roof :-)
Hurray, rain! I heard by radio today that you were probably getting rain. Congrats. May it soak your soil gently and deeply...The roof pattern looks nice.
mountainmoma
Mon, 12/13/2021 - 20:31
Permalink
It is not a gently rain. I
It is not a gently rain. I have had, I dont know, over 10 inches ? in the past 24 hours. Some people on steep areas in the valley below me have to keep an eye on things there is always the risk of mud slides, now re-labeled debris flows. The wind was pretty crazy last night, it has calmed down for right now