
Self Watering Containers

One of the biggest challenges of container gardening is regulating the wetness of the soil inside them.
Unlike the ground, where excess rainfall will usually sink deep into the soil and away from the roots of your plants, containers don't have enough volume to handle too much water. That's why most of them have a hole in the bottom, to allow drainage of excess water once the soil is fully saturated. Most people just pour water onto the container until some starts flowing out the bottom. Takes less judgement but then wastes water, and a proper Green Wizard hates waste. In addition, plants need some air to their roots too, oxygen and nitrogen gas that makes its way into the soil. Just like earthworms, who come up to the surface and then dry out on your driveway, drowning from too much water, soaked soil prevents those gases from getting to the roots.
That lack of soil volume has a flip side, too little soil to maintain decent moisture. Its easy for planters and containers to dry out, often too easy. A hot day with a lot of sun, can leech the water right out of one. So your plants go through a unhealthy cycle of too much water, then too little. That bad enough for flowering plants that are grown just for decoration, but can be doubly bad if you are trying to grow vegetables. This water stress can cause the plant to grow poorly, set fewer fruits and sometimes even if the fruit grows, can cause big problems as they ripen. Tomatoes can split and crack when exposed to too much water at the wrong time.
We want a way to provide our plants water, without over saturating the soil AND to be able to retain water for a longer time.

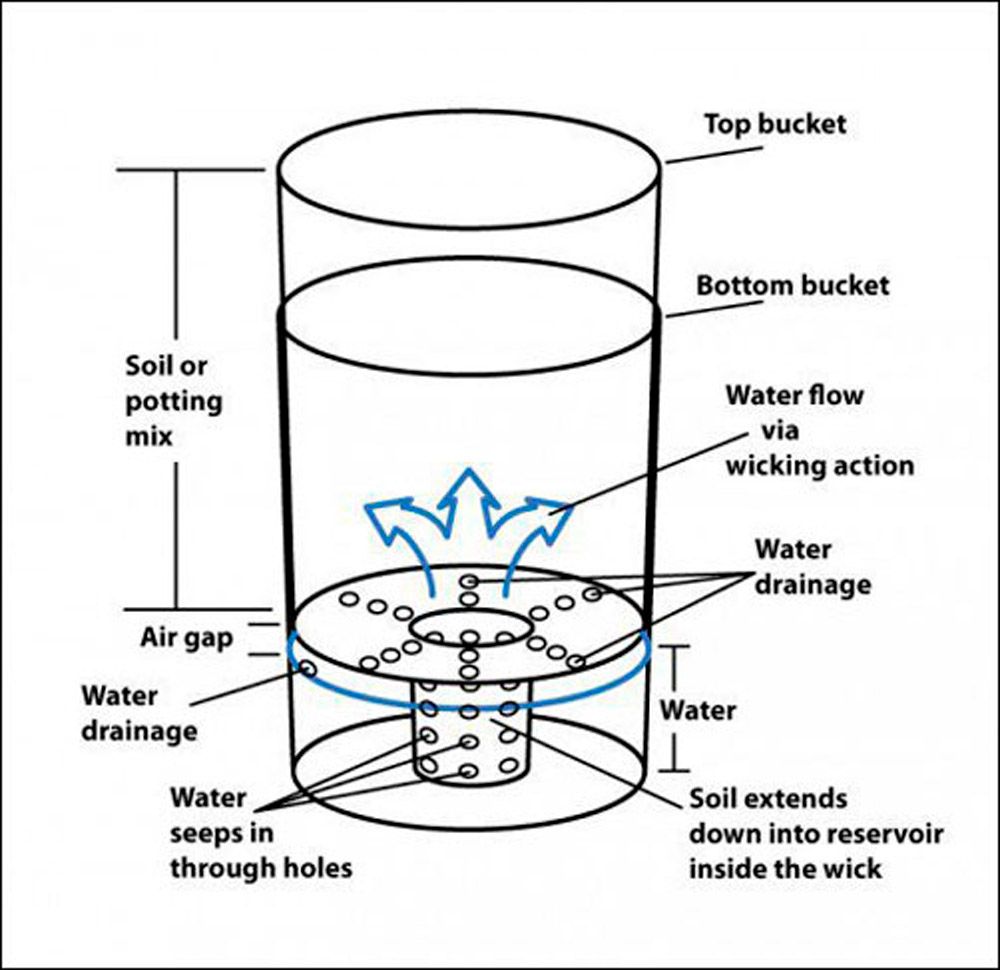
You often see these described on the Internet as "self watering planters", but I think of them as planters with the ability to store water for the plant between waterings. They are made with a double container system, usually out of 5 gallon and 2 gallon paint buckets. The upper planter containers the soil and plant, the lower container (in the space between the two) provides a storage chamber for water. A wicking mechanism provides a way to draw water up from the storage chamber as the soil in the upper chamber dries, keeping the soil moist but not saturated.
Why use these?
---
Rethinking The Way We Garden - Climate in 2026
I have said here before that over the next three decades that I have to live, being 59 and 7-10 years from retirement, that I expect our global climate to dramatically worsen. Our governments are not going to do anything meaningful about climate change. They are too beholden to moneyed interests that would be affected if steps to cut CO2 emissions were done. Basically all you and I can do is find ways to live in a world with weird climate, and hope for the best. I am hoping to buy 3-4 acres in a semi-rural area, about 60 miles outside of St Louis, here in Missouri over the next 5 years but the use of containers for plants is something that could be done in both a rural as well as a urban location. Even the most restrictive housing, like apartment complexes, can be counted on have some space for a few pots or containers. Or a sunny window.
I do not think that climate change or possible political instability or civil war will disrupt the supply chain to the point where you can get no food. I do expect that there may be times where local disruption will cause food shortages. I also expect that as oil and phosphates get scarcer, industrial farming will put out a less nutritious product. Studies show that in an environment of increased CO2 levels plant productivity decreases. Food you get will be less good for you and more expensive. Having a home garden may be the difference from barely getting by and surviving. Learning to grow plants which look decorative and not food, while being a source of vitamins (like Purslane) will be an advantage.
The Midwest of the United States doesn't face sea level rise but we will certainly see dramatic shifts in the normal growing seasons we have become accustomed to. I am expecting that periods of intense heat will happen during the Summer. Week long heat waves will put tremendous stress on plants as well as cook the ground surface making watering a problem. When rain does come, the increase in global energy will bring heavy rains and possible flooding. Winters will get milder and shorter offering the chance to plant earlier and perhaps harvest before the Summer heat. The changes to the Jet Stream, with dips to the Southern States like Texas due to loss of Polar Ice will give us the occasional massive snow storm, with huge snow falls and frigid temperature.
In such a climate I believe the adaptability of growing our food in containers is the way to go.
Personally I plan on having at least two good size green houses on my property. Built along the lines of a "Walapini", which is a dug in, earth sheltered green house. South facing with a thermal mass back wall, it can provide a growing space throughout most of the year. Adding a roll up transparent roof would allow better sun during mild weather. Using containers would allow you to bring the plants out into full sun during those periods, while allowing you to seek shelter during storms or sudden cold spells.
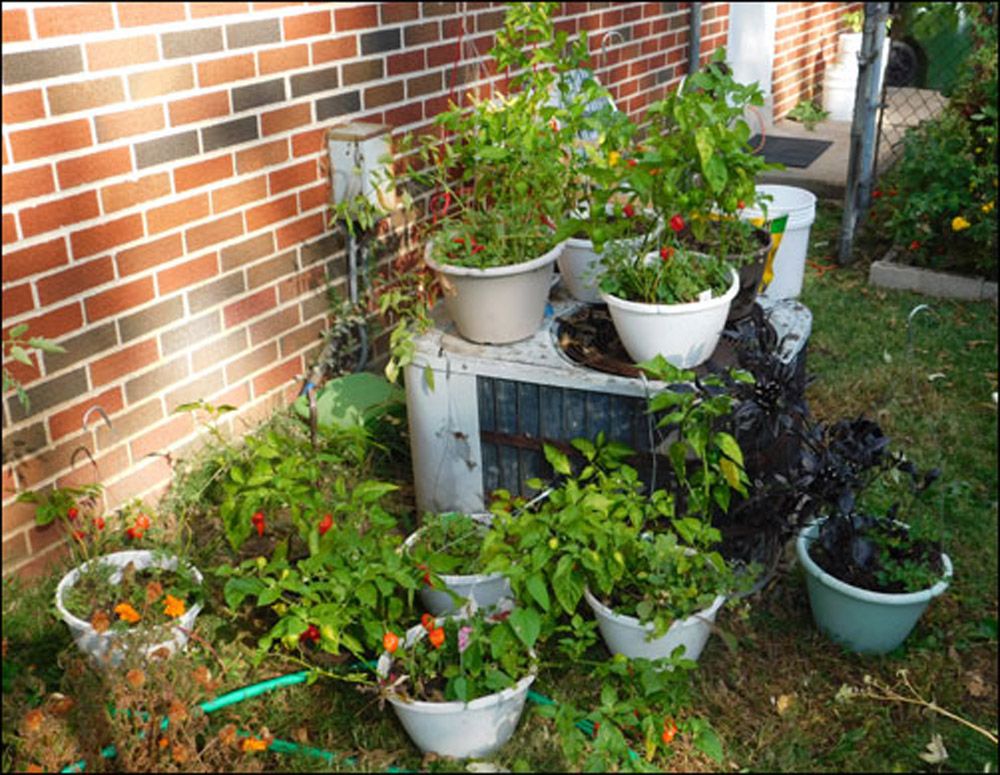
In the short term though, I wanted to try saving some of my pepper plants by bringing them in before the cold sets in. I had a very good harvest off of the dozen or so plants I put in hanging baskets.
---
The Secret - Wicking Action
We want our plants to have water but not too much water. Simply putting them in pots with soil and then pouring water on top of them will end up with a very soggy lower area, or not enough water at all. That is where "wicking" comes into play.
Wicking is the physical property a liquid has, where it will spread out as far as possible in the space it occupies. Pour water into a bucket of soil and it will slowly equalize the amount of moisture across the entire bucket. Add enough water and once saturation happens, that is the soil is a wet as it can be, then the excess will sit at the bottom. As evaporation happens at the surface, and the soil dries, more water will be pulled upward to equalize again.

You also see this action in candles. The cloth wick pulls liquid wax and sometimes oils up from the candle and into the burning section of the wick. That's why wicks don't completely burn down in just minutes but continue. The combustion actually takes place in the space just above the wick.
We want to use this action without having our plant roots down in the soggy part. Roots need some air along with water. When they are completely drowned they can rot. So somehow we need to be able to access the water at the bottom without over watering the whole planter.
In researching this project I found many people use a cloth "wick". They often use rolled up towels or even socks, with one end pushed through a hole in the bottom of the upper container, with enough cloth to lay down in the water of the lower container. The upper part of the cloth then is in contact with the soil and water is drawn up through the cloth and into the soil.
The downside of using a cloth wick is most will rot and disappear in just a few months. If your plant hasn't grown its roots down through the holes in the bottom of the top container by then, you will not have a self watering planter anymore. You can still water from the top until you find the roots down into the bottom container.
Other people use a plastic container as a wick. It's drilled with small holes then packed with dirt. It is placed in a center hole allowing it to just touch the bottom of the water chamber. This is the method I used.
---
Getting Started
Typically these planters are made with two similar buckets, the top one provides a grow space and the bottom one, water storage. Using regualr old 5 gallon buckets is the most common, but I have some using 2 gallon buckets. Any two buckets which can be stacked one inside the other will work.
They are relatively easy to make and cheap. I purchased all of my components for this demo but with a bit of looking you can find most of the parts for free. Local restaurants are a good place to find food grade 5 gallon containers. They get much of their bulk food like beans and flour in them.
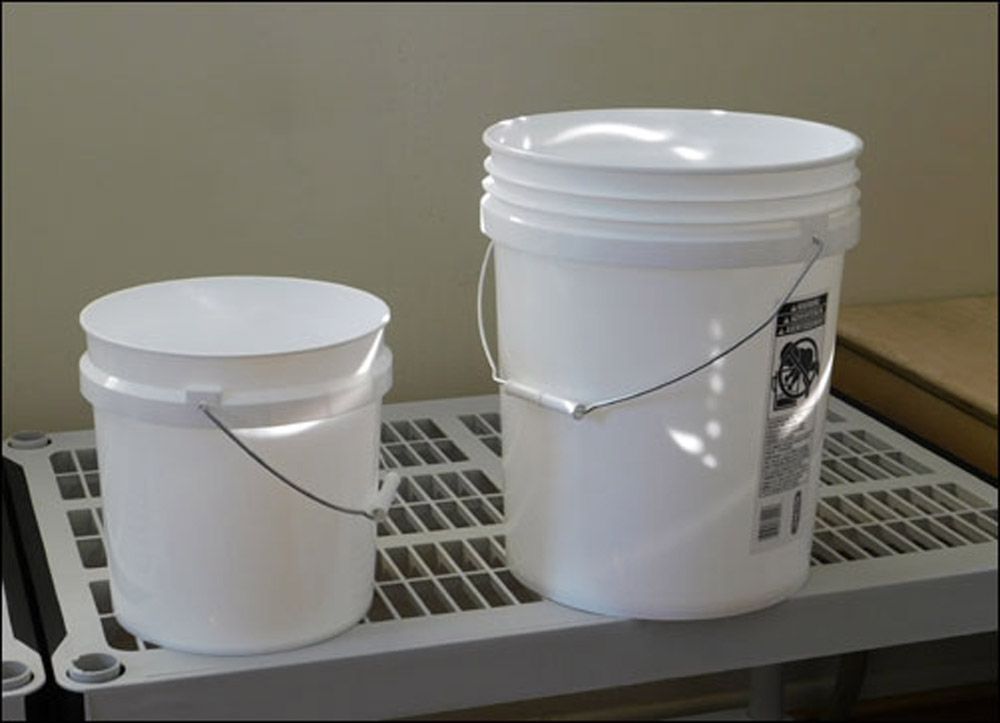
In this case I purchased these from a local hardware store for about $3. You'll need two the same size for each planter you make. You will also need a short length of pvc pipe. Most use a 1 inch diameter pipe but I used 3/4 inch because I had some left over from earlier projects. This pipe is used to fill the water chamber. The pipe goes through the bottom of the upper container.
Then you'll need the plastic container you will be using as a wick. One person I came across used the food containers you get at the deli. Another used empty plastic yogurt containers. What ever you use should have a bottom smaller than the top, or a lip at top. This is to keep the container from slipping out of the hole you cut for it in the top 5 gallon bucket.
You will also need a few tools.
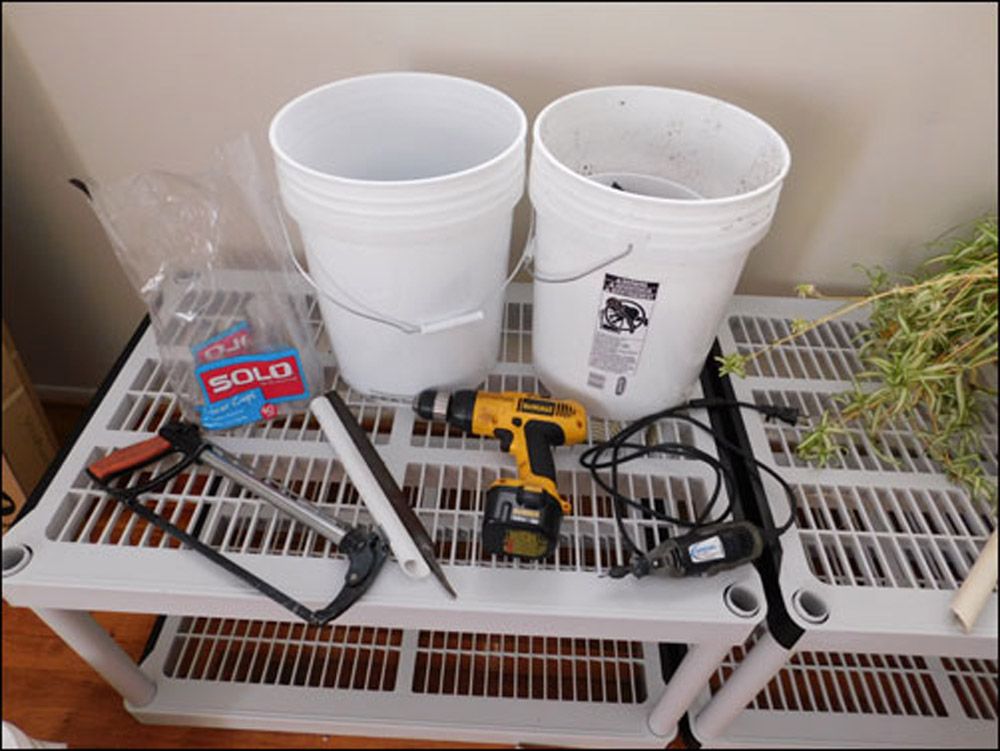
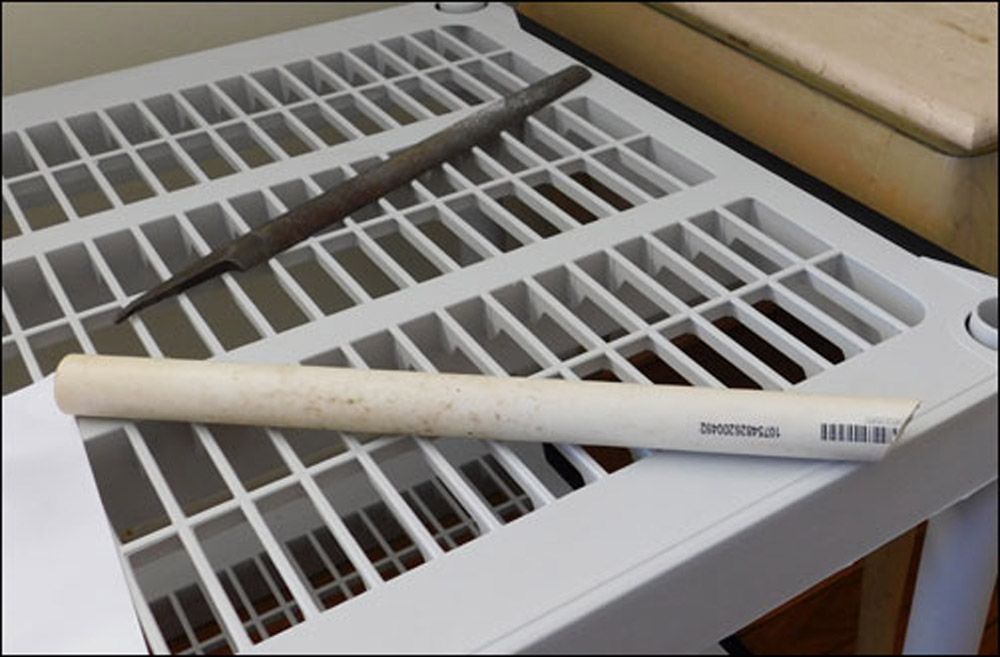
I found that the bulk of the work can be done with a Dremel rotary tool with a small router bit. You'll use it to cut the bigger holes in the bucket. A hand drill with a 1/4 bit, a hacksaw, a X-Acto knife and a half round file are the rest.
---
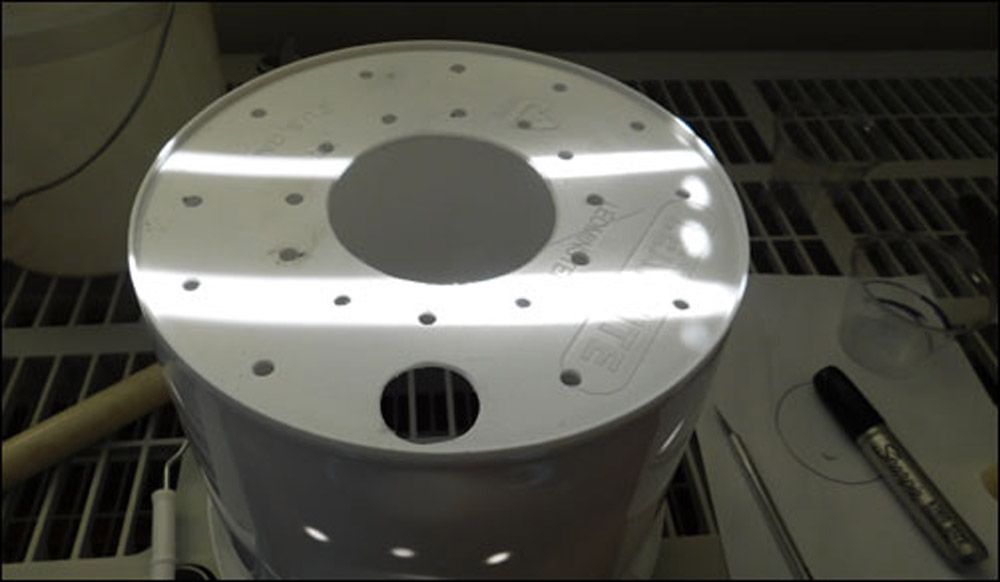
Step 1 - Wicking Hole
For the wicking chamber I am using plastic 9 oz cups made by Solo, purchased at the grocery store. The bag had 40 for a couple of dollars.
My buckets had a small ridge on the bottom, so the first thing I did was cut a hole around this ridge.
And then tried the cup through it.
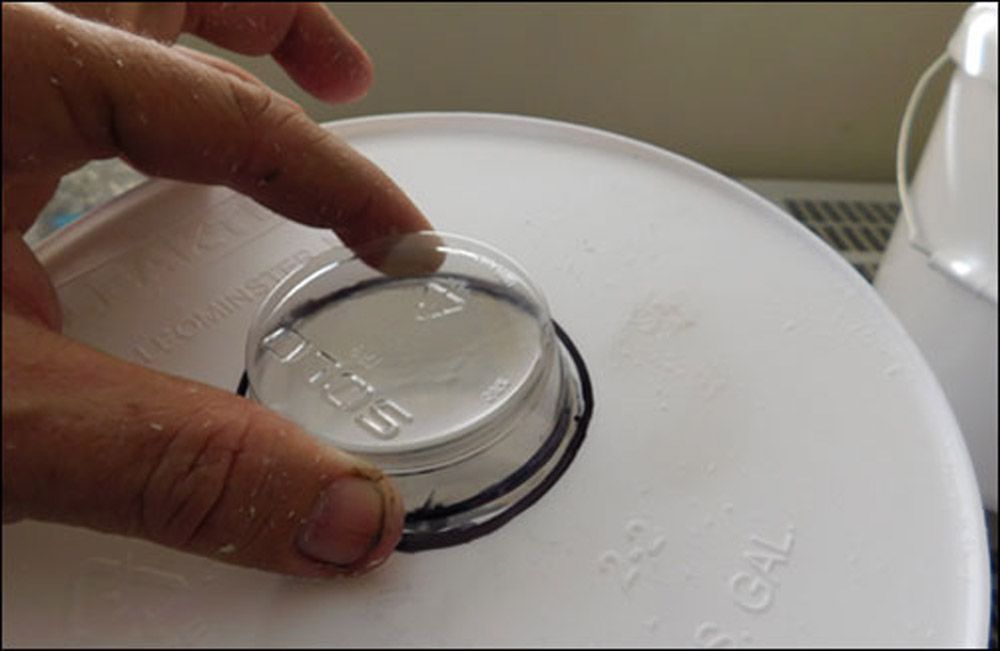
Hopefully you've cut the hole slightly smaller than you need. Take a magic marker and trace around the outside of the cut. Put the body of the marker against the side of the cup and it will draw a line about 1/4 of an inch larger than the cup. This will give you a fairly good outline to cut to. Using the Dremel, recut the hole slightly larger. You may have to do this several times, working your way up the cup. You want to be where the cup sits just a little bit above the bottom container. This way when you fill it and put the top container in, the cup won't push itself out of the hole and let soil drop into the water chamber.
Clean up the hole with the hand file. I put a slight bevel on it, towards the inside of the bucket to better seat the cup. Minor gaps are ok.

I got lucky and for the 5 gallon buckets, cutting the hole until the cup rested on its lip was a perfect fit. For the 2 gallon buckets I didn't need to be that deep.
---
Step 2 - Drainage and Watering
You can also see in that photo the next step, that is to drill the drainage holes in the bottom of the upper bucket. This one is a 2 gallon bucket. I drilled two rows of 1/4 inch holes. In the 5 gallon buckets it was three. Space them out but don't stress too much about perfection. They are there to let excess water drain from the soil if you put the planters outside and it rains.

When you do this, put the upper container into the bottom one. Hold it up to the light and note where the bottom of the upper one is. About a half inch down from there, drill a 1/4 inch hole. This lets excess water drain out of the water chamber.

Notice that you have quite a bit of space for that water chamber, perhaps 3/4 of a gallon.
Next, we want to put in the filling pipe. Cut a piece of pvc pipe as long as the two containers are tall, when they are put together (from the drain hole picture). Add a couple of inches so it sticks out and gives you a better access to fill it. Cut one end at an angle
Cutting the end that goes into the water chamber prevents the pvc pipe from sealing itself on the bottom.
Next take the uncut end, and use it to draw the size of hole you will need. Use the Dremel to cut it out.
You can also take a moment and make a templete for the wicking cup hole. Put a piece of paper over the hole and trace the size. Cut it out and you can then use it to get a hole that should just need a bit of clean up with the hand file for your later planters.
Push the pvc pipe through the hole.

---
Step 3 - Finishing the Wicking Cup
Next you want to put some holes in your wicking cup so water can get into it.
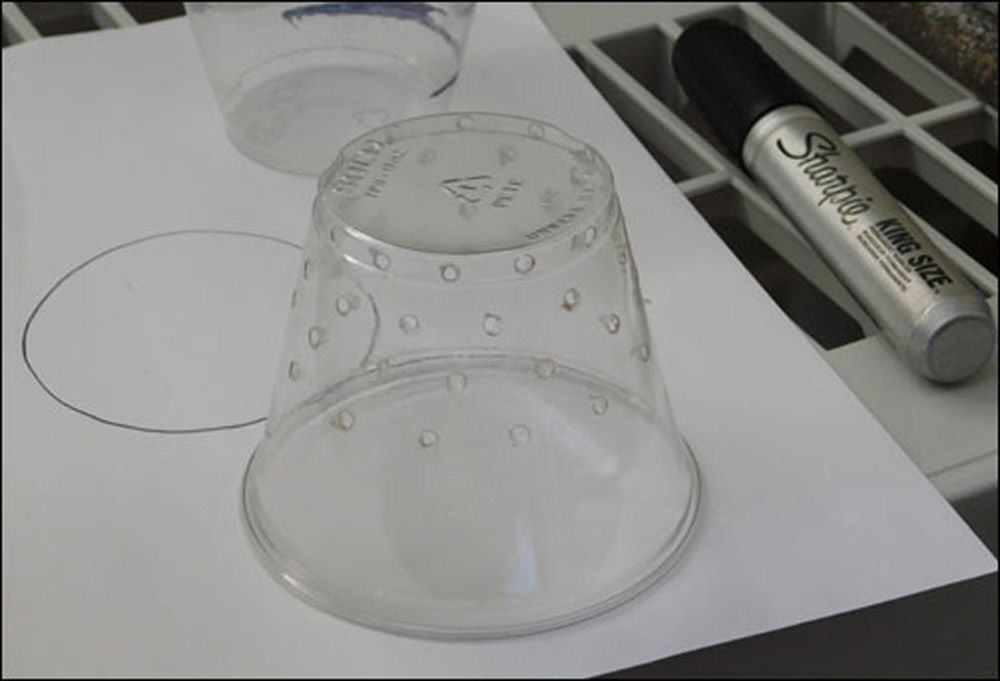
I use the Dremel to make these since I only wanted them to be about 1/8th inch. Go up about two thirds of the distance the cup sits through the hole. Don't put any holes in the bottom.

Now take all the parts and give them a good cleaning with soap and water. Especially the buckets. Most plastic items will have a thin coating of mold release, a chemical that helps the part separate from the machine that made it. You don't want this getting into the food you eat.
Once you've done this, its time to add some soil.
---
Step 4 - Fill It Up
For the lower third of the planter I used a mix of 4 parts potting soil and 1 part vermiculite. I wanted the soil in that section to be a bit looser and easier for water and air to move through.

Take the wicking cup and fill it with this mix, tamping it down into the cup firmly.

Put the cup down into the bucket and seat it. Push the pvc pipe down so it touches the bottom of the lower container too. I rotate the top bucket so that the pvc pipe is on the opposite side of the lower bucket from the drain hole, in the theory that when I fill the lower water storage area, new water will push old water out.
Then fill in the bottom of the bucket with the 4/1 mix to about a quarter of the way to the top.
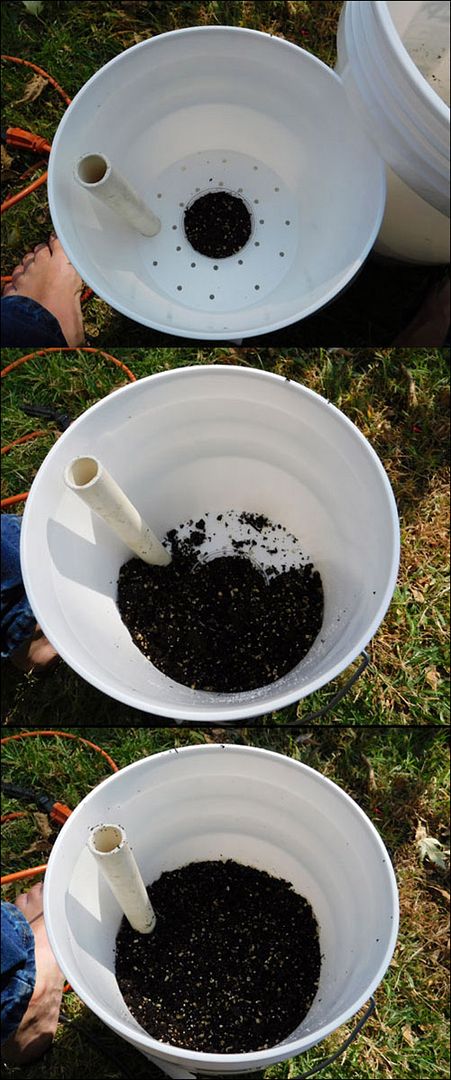
I leave it loose except for around the pvc pipe. Next fill the bucket with potting soil. I only went to about 2 to 3 inches from the top. I may want to add a bit of compost to the container next year when Spring comes and I put them outside.
At this point you are ready to plant.
---
Wrapping Up
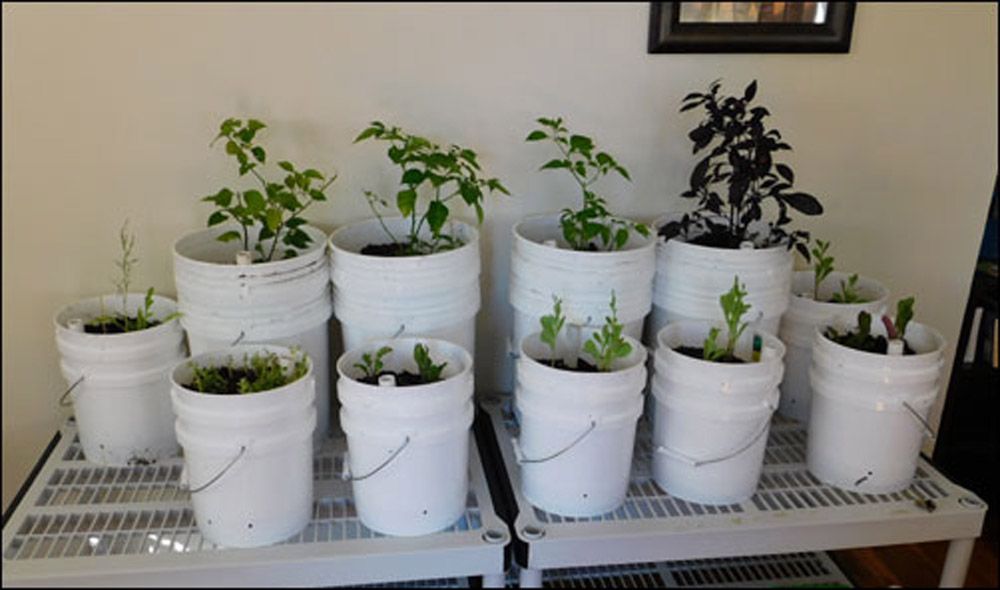
My original plan was to try and save a few of my peppers but I realized that I needed to go a bit further, seeing if I could also have a garden indoors. I also want to do some early Spring seed starting, so I needed the room for more than just a few containers.

I had some old shelving in the basement, enough to provide me with two sections like this. I had to put them upstairs in an unused area of the apartment because my basement doesn't have electrical outlets for the grow lamps I purchased. If I take this further, next year I'll have the landlord install a separate circuit breaker for some outlets down there.
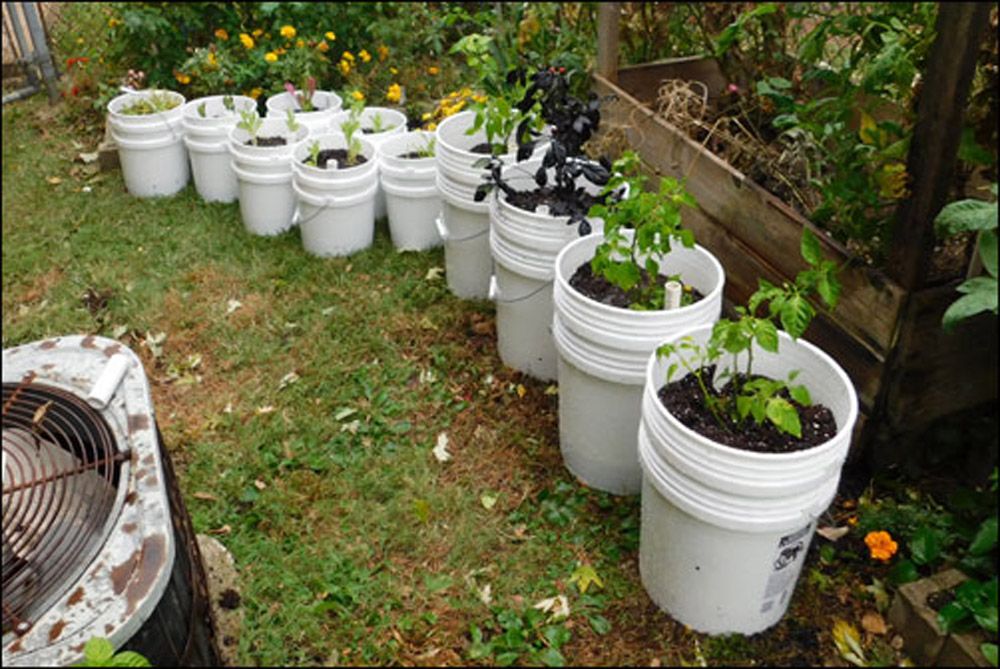
I will end up with probably 8-10 larger 5 gallon containers with peppers, while my 12-14 smaller 2 gallon containers are going to be planted with cooler plants like lettuce, spinach and onions. I am seeing if my purslane plant survives and also have a second one as a starter.
The room shouldn't get below about 60 degrees and depending on the amount of electricity the grow lamps use, they should get about 8-10 hours a day of light.
I'll post more photos once I get the lamps set up and the rest of the containers made and planted.
Magpie
Sun, 10/23/2016 - 20:47
Permalink
Bury them?
I like these, but I can't help but think back to all my failed potted plants in the past. Once the temperature gets above ~110F, which happens more and more often, my aboveground pots have baked, even with a suitable amount of water in them. I think that burying the pots would help keep the soil a bit cooler. As you say, though, doing this on a larger scale would be a big headache!
One thing you might want to consider is underground drip irrigation. I've done some ag work in the great basin, and this is really a water efficient way of growing plants, as there is minimal evaporation in even very hot/dry conditions. All you need is an old garden hose you don't mind sacrificing, pierce it with a nail at even intervals, and crimp one end. Run it along where you'll be planting your plants and ta-da! a cheap drip irrigation system. It's especially good as you can use up your neighbors' local leaky hoses, as leaks are what you want for this application. Commercially, they use drip tape for a single season, but this is only because they run machinery through the field and tear the poor things to shreds. If you're doing everything by hand, you can carefully work around your hose and use it for many years.
Also--fyi, you don't need full-spectrum grow lamps for starting seeds in the basement! My grandmother-in-law uses bog-standard fluorescent tube lights: one pink, one blue, and they work well. Her plants never get too leggy when they're starting out, and it uses a whole lot less electricity than standard grow lights (and is cheaper to boot). Worth considering!
David Trammel
Mon, 10/24/2016 - 13:05
Permalink
A Mix of Containers and In Ground Raised Beds
First, here's a picture of the shelving with the grow lamp installed.
I've got all of the plants I have in containers under it right now, plus the two hanging plants I'm bringing in. A spider plant I've had for a few years and the Purslane plant I mentioned in another thread. They both are going into my office and getting their own small single light. Its starting to get a bit colder, down to the 40s tonight, and everyone has been inside for a few days without sun, so I stuck them all under this lamp. I'll hang the second this week once I cover the window with plastic and a thermal cover (aka a big sleeping bag).
Its a four bulb, four foot grow lamp made by VitaPlant. It ran me $160. I picked up three.
Let say this on how much these cost.
Yes, I could have gotten a couple of cheaper Home Depot grow bulbs for a floresent fixture. In fact I did a few years back. I was not happy with the way the seeds did not seem to grow. Now the lamps may have not been a factor I realize but one of the things Greer and here on the GW forum we have mentioned, is that right now is the time to experiment.
Why?
Because a failure will not be critical to your survival.
If I've over spent, and these are too much of an energy hog or they don't provide the results I want, that's ok. I'm working a job that has me doing 55-60 hours a week and frankly I can fund all my long term plans AND have some money to waste on unsuccessful experiments. I realize not everyone who reads this can do that.
Luckily you get to learn from my mistakes.
I don't know what kind of power the grow lamp will draw, I'll be getting one of the meters that can tell me that the next week or so. Doesn't seem to put out much heat, which is good. Heat is wasted energy.
Based on the way the lamp covers, I'm going to put one over eight 5 gallon containers with the peppers. Then on the other shelf, pobably eleven 2 gallon containers. The nursery had a few vegatable flats left over and I picked up a 6 pack or romaine lettuce and a mixed 6 pack of other types of lettuce. Those are in 6 of the 7 in the picture, the 7th is my newest purslane plant.
Walmart (yes I went there for a few cheap sleeping bags this weekend for my windows, hangs head in shame...lol) had a cart load of the Jiffy brand seed starter flats (72 plugs) for $1 each on close out. I bought 5, and am going to seed start some spinach this week, to plant in the other 4 containers with the lettuce.
-------
Ok your second comment, underground watering.
Actually take a look at this thread I did a while back.
How To Make A Raised Bed From Concrete Blocks
If you scroll down a bit, you'll see some pictures of the nearly completed beds with a pair of white pvc pipes sticking out of the ground. When I built those beds, I made some pvc loops which I put into the ground about a foot down. They had 1/8th inch holes drilled all over their downside, so that water could drip out. You could water the plants at their roots with those.
I am actually planning on having both. A pair of green houses where the plants are in containers, to be moved in and out as needed AND some raised beds for more static planting. These will use an in ground watering system I'm sure.
The thing is, after having to get down on my hands and knees to weed my current beds several times this year, I'm so over short beds. The ones I do make will be at least 3 feet tale so I don't have to do that again.
Here's the complete set up with the sleeping bag over the window for insulation. Makes a great place to sit beside during the evening and read a book.
Caryn
Tue, 10/25/2016 - 14:57
Permalink
Thanks!
Thanks for this - very easy to follow to make. Great set-up you're getting together. It seems wherever I live, the only or best option is also potted plants for one reason or another. It's heartening to read your assessment that that is not such a bad thing or bad practice to follow.
I have 2 nursery bought planters that have such a system in the bottoms - everything I put in them does exceedingly well with far less effort or scrutiny. I also wanted to ask: I bought some flowers years ago and have kept the plastic pots, (they are long/tall and fairly narrow) some of them have loads of holes drilled into the sides. These are harder for me to keep watered as the water dribbles out of the holes. I just have to keep a keener eye on them, but the plants also do well in them. I've often wondered why in the world the nursery would have drilled the holes in the sides at all! Maybe I'm doing this wrong. Could those holes be some sort of wicking effect? Maybe I should be doubling those pots inside larger pots? Or shallower bowls of water? Or are they just meant to be watered and tended more frequently?
David Trammel
Wed, 10/26/2016 - 16:06
Permalink
Costs
"It seems wherever I live, the only or best option is also potted plants for one reason or another. It's heartening to read your assessment that that is not such a bad thing or bad practice to follow."
---
As for the holes in the plastic containers we get plant starts in at the nursery, I've noticed that they have similar holes. I wondered at it myself until I happened to be there when they water the plants. The employee had a hose with one of those soft shower type of nozzles and simply walked along spraying the plants. Since they do that everyday, they aren't concerned about the plants drying out, but they definitely don't want to drown them.
I would bet that if you put them into shallow bowls of water that they would naturally wick as needed.
To me the pros and cons of container gardening versus inground gardening depends on a variety of factors.
First the size of the garden. Small scale, lets say a dozen plants or less, container gardens in my mind are often the best option. Its when you begin to get larger that inground growing is better and that is because of cost.
When you consider that per container costs of around $10 is probably correct, between container and soil then the option to defray that by using the free commons of dirt in the ground, with some soil additives is more cost efficient. Just like Greer has pointed out, when we can offload our costs onto something like our pre-existing back yard, then that is cheaper. To move all the plants I have in my raised beds now, into containers would mean easily 30-40 containers. When I can just buy $50-75 worth of compost to add to the soil and grow them in the ground, the difference is huge.
Also, when you consider that a well planned composting program, and moderate rotation of plants, then you can continue to grow in the same patch of ground for a long time.
Its when you consider the cost advantage of fexibility of containers, that I think they prove best.
In the last decade its become common to have late Spring snow storms here. I've not had luck getting early Spring plants in, due to my work schedule but had I done so, I probably would have lost one or two crops due to bad weather.
That's not even thinking about the possibilty you may need to move or relocate, either temporarily or permanently. A garden you have to leave is a garden you don't eat from.
I'll have to think about this more...
David Trammel
Sat, 02/09/2019 - 19:44
Permalink
Bump for the Spring
Thought I'd bump this thread, since I've included it in the current lesson on "Thinking In Systems".
David Trammel
Sun, 09/20/2020 - 18:58
Permalink
Dog Crate Liners To Prevent Spills
I was having a problems with the drain hole on the buckets dripping water when I moves the containers. Recently I got one of the rubber trays that go in the bottom of wire dog crates from the pet store and use that between the containers and the shelves. It catches any water and allows me to slide the containers around easier. The containers catch on the plastic grill of the shelf.